I found [Stefan]‘s work through his older, but interesting TinyProjector project. He opted to use multiple diodes in various configurations with rotating mirrors to create images. He’s built quite a few interesting projects over the years. The WeatherTank is pretty sweet.
[shakirfm] sent us this LED persistence of vision (POV) laser projector that can display dot matrix style text. The laser projector contains a rotating mirror assembly and 5 lasers. We’ve covered other POV projectors,but this one is a bit different. The mirror assembly rotates using two cooling fans. Controlling on/off times of the lasers along with the mirror speed, it is able to project 8×5 dot matrix ASCII text onto a surface.
The Atmel 89s52 contains a built in user interface which can control the horizontal character width, scroll speed and the number of characters displayed at a time. It can also store preset 10 character text messages internally, or accept text via the serial port from a PC. Eventually SMS messages from a GSM phone will be supported. [shakirfm] has more details and ideas for improvements here.
Posted in classic hacks, laser hacks, led hacks, misc hacks
[kap4001] built what has to be the simplest laser scanner possible. It’s two servos strapped together with zip ties plus a 5V laser module. They’re connected to a Pololu serial servo controller. The laser is pulsed by switching the DTR line. You could use it to draw images like the one above… except that’s an 85 second exposure.
With the availability of webcams and projectors, multitouch and interactive demos have become increasingly popular because they’re so easy. Students at the University of Tokyo took a new approach that uses lasers instead. They created Sticky Light, which uses mirrors, a laser, and a single photodetector. Unlike camera-tracking setups, this system requires no visual processing. The laser moves around and bumps into dark objects, sticking to them. It can follow drawings on the table or objects in space, such as shirt designs. They also created a few basic games and a demo that makes sounds based on the movement of the spots. Video of the project after the break.
[Joey] likes to dabble in laser projection, building his own hardware and writing the software that drives it. One way that he tests his setup is by replacing the laser assembly with an analog oscilloscope. This allows him to ensure that the driver board is receiving data from the software, and translating it into the correct electrical signals to drive the motors controlling the mirrored redirection of the laser beam.
In the video linked above [Joey] walks us through this process. It starts by connecting scope probes to the digital-analog-converter card that outputs image data for the projector. From there the XY mode is used to map the two channels perpendicular to each other; the motors that these signals are meant to control have mirrors that also move perpendicular to one another. After adjusting the scale and the timebase you will see the pattern the laser dot is meant to trace.
[Joey] entered this in a Tectronix contest. There’s plenty of other interesting entries to browse though. If have an entry that you’d like to see featured, or if you come across any other interesting stuff, don’t forget to tip us off.
Vector based displays were used for arcade games in the ’70s and ’80s. A typical CRT uses raster graphics, which are displayed by deflecting a beam in a grid pattern onto a phosphor. A vector display deflects the beam in lines rather than a full grid, drawing only the needed vectors. Perhaps the best known vector game is the original Asteroids.
[Jeremy] built up a RGB laser projector, and wanted to run some classic arcade titles on it. He started off by using the XMAME emulator, but had to modify it to communicate with the laser and reduce flicker on the display.
To control the laser, a modified version of OpenLase was used. This had to be enhanced to support RGB color. The modified sources for both the MAME emulator and OpenLase are available on Github.
[Jeremy]‘s friend, [Steve], even got a vector based game that he wrote working on the system. “World War vi” is a shoot-em-up battle about the vi and emacs text editors.
The results of the build are shown in a series of videos after the break.
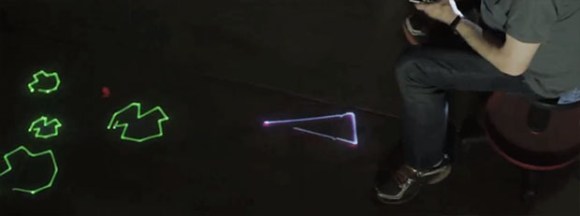
In 1979, [Nolan Bushnell] released Asteroids to the world. Now, he’s playing the game again, only this time with the help of a laser projector and a Kinect that turns anyone sitting on a stool – in this case [Nolan] himself – into everyone’s favorite vector spaceship. It’s a project for Steam Carnival, a project by [Brent Bushnell] and [Eric Gradman] that hopes to bring a modern electronic carnival to your town.
The reimagined Asteroids game was created with a laser projector to display the asteroids and ship on a floor. A Kinect tracks the user sitting and rolling on a stool while a smart phone is the triangular spaceship’s ‘fire’ button. The game is played in a 150 square foot arena, and is able to put anyone behind the cockpit of an asteroid mining triangle.
[Brent] and [Eric] hope to bring their steam carnival to LA and San Francisco next spring, but if they exceed their funding goals, they might be convinced to bring their show east of the Mississippi. We’d love to try it out by hiding behind the score like the original Asteroids and wasting several hours.
[Mark] was looking for a cheap disco laser projector for parties, and he found one. Unfortunately for him, the advertised features were a bit lacking. The “sound activation mode” was merely an on off circuit, as opposed to it actually being controlled by the music — he set out to fix this.
Taking the unit apart revealed a very convenient design for hacking. All of the components were connected to the main PCB by connectors, meaning the laser driver board was completely separate! He replaced the PCB completely using a prototyping board, an Arduino pro mini, a microphone with a simple preamp, a rotary encoder, and a MSGEQ7 chip to analyse the levels. Oh, and a MOSFET to control the motor via PWM output. It even ended up being close to the same size as the original!
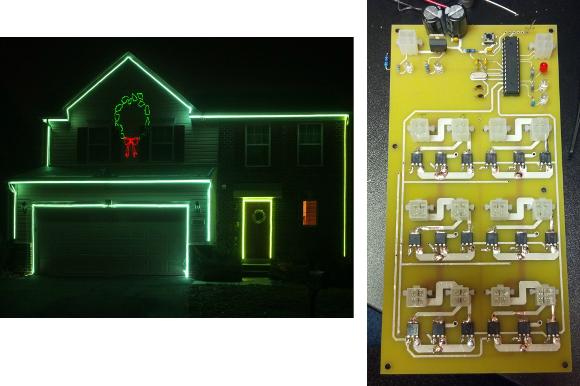
It’s August, and of course that means that it’s time for retail stores to put up their Christmas decorations! But seriously, if you’re going to do better than the neighbors you need to start now. [Joey] already has his early start on the decorations, with a house-sized light show using LED strips and a laser projector that he built last Christmas.
What started off as a thought that it would be nice to hang a wreath over the garage soon turned into a laser projector that shows holiday-themed animations on the front of the house. The project also includes a few RGB LED strips which can match the colors displayed by the projector. The LEDs are powered from a custom-built supply that is controlled by a laptop, and the program that runs on the computer averages the colors from the video signal going to the projector which lights up the LED strips to match the projected image. This creates an interesting effect similar to some projects that feature home theater ambient lighting.
The only major problem [Joey] came across was having to account for the lasers’ motion in the projected patterns, which was causing the computer to read false values. This and a few other laser-related quirks were taken care of with a bit of programming to make sure the system was functioning properly. After that it was a simple matter of attaching the projector to the roof and zip-tying the LED strips to the eaves of the house.
The projector is weatherproof, has survived one harsh winter already, and can be up and running for any holiday. With Halloween right around the corner, this could be a great way to spice up some trick-or-treating. Check out the video after the break to see this setup in action.
After two years of EE coursework, [Joshua Bateman] and [Adam Catley] were looking for a fun summer project. Instead of limping along with the resources they could put together themselves, they managed to get their school — Bristol University — to foot the bill!
Now Uni’s aren’t in the habit of just forking over funding for no reason, and we thing that’s why the two did such a great job of documenting their work. We’re used to seeing blogs devoted to one project, but this one has a vast portfolio of every piece of work that went into the build. Before any assembly started they drew out design diagrams to form the specification, laid out the circuit and the board artwork, and even worked out how the software would function in order to make sure the hardware met all their needs.
When the parts arrived the work of hand-populating the surface mount boards began. This is reflected in the fast-motion video they recorded including this clip which features a 176 pin LQFP. The driver board is a shield for a Raspberry Pi which drives the Galvanometers responsible for the X and Y movements of the mirror.
The video below shows off their success and the blog makes a great resource to point to when applying for work once a freshly minted diploma is in hand.
Last year, [Alvaro] built a laser turret robot for the DEFCONBOTs competition. It worked pretty well, but this year, he decided to step it up a notch. Now instead of moving the entire robot laser array, he’s using galvanometers to move only the laser — he’s essentially built a mini laser projector.
A galvanometer is basically a very sensitive ammeter that moves — it can also be used as a very precise electro-mechanical actuator, for say, moving a tiny mirror. As you can imagine, you can actually build home-made galvanometers — but it’s really not that easy. Instead, [Alvaro] opted to order a few laser show controllers on eBay, and hack his way to a solution — we approve.
Wiring up the galvanometers and making some circuitry for them was the easy part. The tricky part is automating the system.
You see before when the laser was attached to the camera, it was pretty simple. The laser shoots where the camera shoots. Any simple image recognition software would work. But now that the two are independent, it’s not that simple. If you could mount everything precisely, you could use trig to calculate laser angles and the resulting locations, but the problem is… mounting everything precisely:
If I was a machining/CAD wizard, I could mount the laser, galvanometers, and camera precisely enough that I could use some math to calculate angles/depths and figure out where the laser is going.
As I mentioned previously though, I am no CAD wizard, and my mechanical skills are… lacking. With no mechanical solution to the problem, I had to start getting creative with software.
His software solution is pretty cool. It requires calibration by creating a grid of pre-defined points, but from there, the possibilities are pretty endless. Take a look.
And now some ping pong balls as targets.
And finally — a moving train.
Anyone remember that laser targeting mosquito system? Why aren’t those in production yet! Get on it [Alvaro]!
At its heart is an Arduino Uno and an Adafruit Motor Shield v2. The green laser is turned on and off by the Arduino through a transistor. But the part that makes this really a fun machine to watch at work are the two stepper motors and two mirrors that reflect the laser in the X and Y directions. The mirrors are rectangles cut from a hard disk platter, which if you’ve ever seen one, is very reflective. The servos tilt the mirrors at high speed, fast enough to make the resulting projection on the wall appear almost a solid shape, depending on the image.
He’s even written a Windows application (in C#) for remotely controlling the projector through bluetooth. From its interface you can select from around sixteen predefined shapes, including a what looks like a cat head, a heart, a person and various geometric objects and line configurations.
There is a sort of curving of the lines wherever the image consists of two lines forming an angle, as if the steppers are having trouble with momentum, but that’s probably to be expected given that they’re steppers controlling relatively large mirrors. Or maybe it’s due to twist in the connection between motor shaft and mirror? Check out the video after the break and let us know what you think.
The video’s in three parts: looking at the laser beams in action as you’d see them on a dance floor, then watching the projected images while looking at an insert of the Windows application, and then watching the steppers and mirror doing their rapid movements.
In the world of big-box retail, December 26th is a very special day. The Christmas music playing on the overhead speakers switches back to the family friendly Top 40, the store’s decorations get tossed in the compactor, and everything that’s even remotely related to the holiday is put on steep clearance. No more money to be made on the most commercialized of all holidays, so back to business as usual.
It’s in this narrow corridor of time, between the Great Holiday Unloading and the new spring products coming in, that you can find some fantastic deals on Christmas decorations. Not that long ago, this would hardly be exciting news for the readers of Hackaday. But Christmas lights and decorations have really started pushing the envelope in terms of technology: addressable RGB LED strands, Bluetooth controlled effects, and as of the last couple years, friggin’ lasers.
That’s right, you’ve seen them all over the neighborhood, probably took a few stray beams to the eye, you might even own your own. Laser projectors have been one of the most popular Christmas decorations for the last couple of years, and it’s not hard to see why. Just set the projector up in front of your house, and you’re done. No need to get on a ladder and string lights on the roof when you can just blast some directed energy up there instead.
Given how popular they are, I was surprised to see a lone Home Accents Holiday Multi-Color Light Projector on the clearance rack at Home Depot for around $14 a few days after Christmas. This was a 75% price reduction from normal MSRP, and right in that sweet impulse-buy price range. Let’s see what’s hiding inside!
Cracking it Open
This particular projector isn’t much different from other’s I’ve seen, except for the fact that it actually has three lasers inside. Usually these projectors are just packing red (662 nm) and green (532 nm), but this one has a blue (440 nm) laser as well. Interestingly, there are only two laser apertures in the front of the unit, which means there must be some kind of beam combiner inside that’s allowing two of the lasers to shoot through one window. Presumably it was cheaper and easier to tack a beam combiner into the design than get new cases injection molded.
Four screws on the back of the unit allow you to pull off the cover, which I was somewhat impressed to see had a decent rubber seal around the edge to keep water out. With the back cover off you notice the first interesting element of this projector’s design: the external heatsink.
I had wondered why they used a metal “knuckle” on the mounting stake, and assumed that the finned design of the piece was just to reduce the material needed. But as it turns out the knuckle is connected directly to the primary laser heatsink by means of a solid metal cylinder, they even put a little bit of thermal conductive material on the mating surfaces. It’s not perfect, but at least it gets some thermal mass outside of the airtight body.
Getting a Closer Look
After removing the external heatsink, the “sled” containing all of the internal hardware slides easily out the back. All of the components of the device are easily accessible, and they’ve even gone as far as using connectors for most of it instead of soldering everything directly to the PCB in the back. It’s like they wanted us to strip it for parts.
The largest components are the motorized optics in the front of the sled, and the primary heatsink at the rear containing the blue and green lasers. The red laser is mounted in the smaller heatsink, positioned 90 degrees from the other lasers. This positioning is necessary for the beam combiner (the small angled piece of glass visible in the center) to send both the red and green beams out of the same aperture.
Examining the Lasers
Obviously the lasers themselves are the most interesting part of this device, so let’s get right to the good part: pulling them out. The main heatsink comes off the sled with a couple of screws on the bottom, and it leaves you with a nice little dual-laser module for doing experiments with. The red laser and its heatsink are also easily removed, but let’s be honest: nobody’s interested in red lasers anymore.
Note the black ring around the blue laser, we’ll get to that in a minute.
The attentive reader might notice from this picture that the lasers are way out of focus: at 3 meters, the spots looked as large as dinner plates. This is easily fixed by using a small pair of pliers on the focusing rings on the front of each laser. Once focused, it becomes pretty clear that these lasers are quite a bit more powerful than the < 5 mW listed on the product’s warning sticker.
In fact, once the blue laser was focused I was easily able to burn pieces of paper and punch holes in black plastic. As for the green laser, it is at least twice as bright as my green laser pointer which is labeled as 50 mW. I don’t have the equipment to measure the actual power of these lasers, but it would certainly not surprise me if they are both at least 100 mW.
Thermal (Mis)Management
Impressively, the designers of this laser put a considerable amount of thought into thermal management. Not only is there a temperature sensor embedded into the heat sink to monitor for thermal shutdown, but there’s actually a tiny heating pad that’s used to bring the laser up to operating temperature in extremely cold conditions.
In the closeup image, you can see the thermal sensor (thin, red wires) and the heating pad are both clearly centered on the laser occupying the left position in the heatsink, which happens to be the green laser. Strangely enough, the blue laser sits in a black plastic sleeve that completely isolates it from the heatsink.
If you run both lasers out of the heatsink, you’ll find that the blue one gets hot to the touch in just a few minutes, while the green still feels like it’s at ambient temperature. It seems from this simple test that the blue laser is the one that needs more thermal babysitting.
If that’s the case, it was potentially meant to be installed in the left side of the heatsink, and yet somehow ended up being installed on the right. In fact I’m willing to bet that the blue laser will almost certainly burn out of these projectors after extended use, as in its current configuration it has essentially no cooling at all.
Blue Laser Playset
If your biggest take-away from this post is that the Home Depot is selling a 440 nm laser you can use to burn stuff, I certainly don’t blame you. If that’s what you’re after, I’d advise putting the blue laser in the red laser’s heatsink. Both laser modules are the same size, and the smaller heatsink should be more than enough in open air. You can then disconnect everything else from the control board, leaving only the blue laser remaining.
But before you power it up, you’ll have to solder in a resistor to take the place of the temperature sensor, or else the control board cuts power to the laser after a few seconds. The sensor reads around 50 KΩ at ambient temperature, so replacing it with something along those lines should keep it happy. In the following image you can see the 40 KΩ resistor I’m currently using.
From the optics section we’ve got a nice little geared motor, a beam combiner, and four optical gratings. Three laser modules and a driver board than can power any combination of them at once. Two heatsinks, one with an integrated temperature sensor. A tiny little heat pad, and finally a rugged looking 5V/2A adapter.
By the time you read this it’ll probably be too late to snap one of these up yourself, but there’s always next year. Who knows what dejected goodies will be lingering on the shelf come New Years 2018?
Do you have ideas for other interesting finds we can tear down? Let us know in the comments below.
Mirror galvanometers (‘galvos’ for short) are the worky bits in a laser projector; they are capable of twisting a mirror extremely quickly and accurately. With two of them, a laser beam may be steered in X and Y to form patterns. [bdring] had purchased some laser galvos and decided to roll his own control system with the goal of driving the galvos with the DAC (digital to analog) output of a microcontroller. After that, all that was needed to make it draw some shapes was a laser and a 3D printed fixture to hold everything in the right alignment.
The galvos came with drivers to take care of the low-level interfacing, and [bdring]’s job was to make an interface to translate the 0 V – 5 V output range of his microcontroller’s DAC into the 10 V differential range the driver expects. He succeeded, and a brief video of some test patterns is embedded below.
We love to hack IKEA products, marvel at Raspberry Pi creations, and bask in the glow of video projection. [Nord Projects] combined these favorite things of ours into Lantern, a name as minimalist as the IKEA lamp it uses. But the result is nearly magic.
The key component in this build is a compact laser-illuminated video projector whose image is always in focus. Lantern’s primary user interface is moving the lamp around to switch between different channels of information projected on different surfaces. It would be a hassle if the user had to refocus after every move, but the focus-free laser projector eliminates that friction.
A user physically changing the lamp’s orientation is detected by Lantern’s software via an accelerometer. Certain channels project an information overlay on top of a real world object. Rather than expecting its human user to perform precise alignment, Lantern gets feedback from a Raspberry Pi camera to position the overlay.
Speaking of software, Lantern as presented by [Nord Projects] is a showcase project under Google’s Android Things umbrella that we’ve mentioned before. But there is nothing tying the hardware directly to Google. Since the project is open source with information on Hackster.io and GitHub, the choice is yours. Build one with Google as they did, or write your own software to tie into a different infrastructure (MQTT?), or a standalone unit with no connectivity at all.
Lumia was once used to refer to a broad swathe of artistic lighting, but these days, more commonly refers to effects that create an aurora-like appearance, as one would see near the poles of our fine Earth. [Adam] first covers the history of the effect, as pioneered by Thomas Wilfred with the Clavilux in the early part of the 20th Century.
The video then covers the basics of creating lumia effects using DIY methods. The key is to combine slow rotation with an organically deformed refractive medium. [Adam]’s rig of choice is a basic laser projector, rotating at just 1/3 of a rotation per minute. This is then combined with a variety of homebrewed refractive media – torture tubes made from glass, acrylic sheets coated with muddled epoxy, and even a crumpled water bottle.
It’s an excellent primer on how to get started with lumia, and [Adam] covers a wide variety of tips and tricks as well as potential pitfalls to avoid.
We see plenty of great lighting projects around these parts – check out the Kinetic Chandelier. Video after the break.
A few years ago, new, innovative pico projectors, influenced by one of the TI development kits, started appearing in Kickstarter projects and other various DIY endeavours. Those projects fizzled out, most likely due to the cost of the projectors, but we got a few laughs out of it: that wearable smartphone that projected a screen onto your wrist used the same technology.
But there’s a need for a small projector, a pico projector, or in this case a femto projector. It’s the Nebra Anybeam, and it’s a small projector that uses lasers, and it comes in the form of a Raspberry Pi hat. We would like to congratulate the team for shipping the ideal use case of their product first.
The key features of this pico projector address the shortcomings of existing projectors that can fit in your pocket. This uses a laser, and there’s no bulb, and the power consumption can be as low as 3 Watts. Power is provided over a micro USB cable. The resolution of this projector is 720p, which is sufficient for a quick setup for watching a movie, but the brightness is listed as equivalent to 150 ANSI lumens, about the same as small projectors from a few years ago.
But of course the big selling point isn’t the brightness or resolution, it’s all about the smallness of the projector itself. There is a developer’s kit, a Pi Hat, a fit-in-your-pocket version with an enclosure, and a ‘monster ball’ version of the Anybeam.
You probably recognize that dreadful feeling when you reboot a gadget after updating its firmware, only to be greeted by a blank screen and an unresponsive device. This apparently happened to the previous owner of a bricked RGB laser projector that [Buy It Fix It] got his hands on: it briefly flashed its laser on power-up but otherwise remained completely dead.
A thorough inspection of the major components didn’t reveal any physical damage, so the issue had to be in software. [Buy It Fix It] managed to connect his Segger J-link programmer to the STM32 main processor and downloaded the contents of its firmware, only to find the remains of a PDF file which seemed to have been accidentally flashed into the chip’s program space. Fixing the device should then just be a matter of restoring the proper firmware, but [Buy It Fix It] wasn’t able to find a copy of it anywhere.
What he did find was Maximus64’s GitHub repository that contained a software mod for a different projector model, as well as its original firmware. Flashing that version didn’t fix [Buy It Fix It]’s projector either, although it did now start to actuate its galvos.
A bit of reverse engineering revealed that the two projectors were very similar from a hardware point of view, but had their laser drivers hooked up to different I/O pins: simply cutting the board traces and soldering some wires to re-route the signals was enough to bring the projector back into a working state.
Having to modify hardware in order to make it fit a piece of software is unfortunate, but sometimes you just have to make do with what you’ve got. If you’ve got no firmware to begin with, then you might even have to write your own from scratch.
If you’re into hacking hardware and bending light to your will, [Shoaib Mustafa]’s latest project is bound to spike your curiosity. Combining lasers to project multi-colored beams onto a screen is ambitious enough, but doing it with a galvanomirror, STM32 microcontroller, and mostly scratch-built components? That’s next-level tinkering. This project isn’t just a feast for the eyes—it’s a adventure of control algorithms, hardware hacks, and the occasional ‘oops, that didn’t work.’ You can follow [Shoaib]’s build log and join the journey here.
The nitty-gritty is where it gets fascinating. Shoaib digs into STM32 Timers, explaining how modes like Timer, Counter, and PWM are leveraged for precise control. From adjusting laser intensity to syncing galvos for projection, every component is tuned for maximum flexibility. Need lasers aligned? Enter spectrometry and optical diffusers for precision wavelength management. Want real-time tweaks? A Python-controlled GUI handles the instruments while keeping the setup minimalist. This isn’t just a DIY build—it’s a work of art in problem-solving, with successes like a working simulation and implemented algorithms along the way.